Blending Modes
Here follows a definition for each blending mode (also called composition mode). First of all you must understand that composition works exaclty the same way when applied to objects or to paint strokes (i.e. when you use any of the painting tools). Calculations are exactly the same, so if you know how a red brush stroke blends in a particular color mode ... you know how a red pixel of a blending object will merge with it's underlaying.
Example of each blending mode applied to painting tools
To introduce the following examples some terminology is required.
The base image = the image that is on the background or "under" another in the objects pile. Referring to base color or base pixels referres to the ones belonging to this image. In this example the base image is :
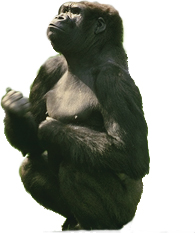
The blend image = the image that is applied to the base image. Referring to blend color or blend pixels referres to the ones belonging to this image. In this example the blend image is :
- King Kong :
- and the base image features the forest (where King Kong leaves naturally) :

- Normal
- Add
- Substract
- Difference
- Multiply
- Screen
- Lighter
- Darker
- Hard Light
- Soft Light
- Overlay
- Dodge
- Burn
- Exclusion
![]() The following examples are for the RGB color
mode but they work exactly the same way if you're in the
CMYK mode or any other one !
The following examples are for the RGB color
mode but they work exactly the same way if you're in the
CMYK mode or any other one !
Normal

This is the default mode. When applying an image over another using the normal composition mode, imagine you just paste the objet "Kong" over the image "forest". If you use an opacity level of 255, the result will always be the values of the pixels of the blend image regardless of the colors of the base image (short of modifying the default envelops properties). Setting the opacitiy level to less than 100%, will automatically average the values of the blend object to the ones of the base.
![]()
Add

The add blending mode simply takes the color information of both the blend and base image and add the base values to the blend values for each one of the RGB triplet values.
If A is the blend image and B the base image :
- Add = { R(A + B) , G(A + B) , B(A + B) }
![]()
Substract

The substract blend mode substracts the RGB values of the base pixels from the RGB values of the blend pixels.
If A is the blend image and B the base image :
- Substract = { R(A - B) , G(A - B) , B(A - B) }
![]()
Difference

This compostition mode inverts the base image according to the brightness values of the pixels in the blend object.
With opacity settings of 255 :
- white in the blend image, inverts the base image absolutely.
- blanck in the blend image, doesn't inverts the base image at all.
- 50 % gray in the blend image, inverts the base image to 50 %.
The result are the same if you imagine that for each pixel :
Difference blending mode looks at brightness values and selects whether the pixels of the blend object or the base objects depending on the one that as the highest brightness value.
Than the colors of the selected pixels are substracted by the values of the corresponding ones in the other object.
- If brightness value a blend pixel is A.
- The brightness value of the base pixel is B.
- A > B ==> A(R,G,B) - B(R,G,B) = result color for the pixel
![]()
Multiply

This composition mode is self explanatory. Multiply looks at the color value in each channel and multiplies the base color by the blend color. The result color is always a darker color. Behaviour at the limits :
- Multiplying any color with black produces black.
- Multiplying any color with white leaves the color unchanged.
If A are the values of the blend pixel and B the values for the base pixel :
- Multiply = { R(A * B) , G(A * B) , B(A * B) }
![]()
Screen

Screen looks at each channel’s color value of both blend and base image pixels, and multiplies the inverse of the blend and base colors. The result color is always a lighter color. The result is comparable at the one you could achieve by using two projectors (one for each image) and pointing them on the same screen.
A are still the values of the blend pixel and B the values for the base pixel :
- Screen = { R(invA * invB) , G(invA * invB) , B(invA * invB) }
![]() You should only use screen with image that
not too light to avoid overlightnening !
You should only use screen with image that
not too light to avoid overlightnening !
![]()
Lighter

Photonyx looks at the brightness value of each pixel and selects the base or blend color—whichever is lighter—as the result color.
- Pixels darker than the blend color are replaced
- Pixels lighter than the blend color do not change.
Selecting the brightness values for each pixels that are to be selected to be the result color whether in the base or blend image is possible and easy. Remember to modify brightness/contrast values !
![]()
Darker

Comparable to Lighter blend mode. Photonyx applies colors of the blend image only if their brightness value is darker than the brightness value of the base image. So :
- Dark in the blend image will not change.
- White will be replaced by the base color.
![]()
Hard Light

This is a little more complex. The result is comparable to shining a harsh spotlight on blend the image. Hard Light multiplies or screens the colors, depending on the blend color brightness value :
- If the blend color is lighter than 50% gray the image is screened, thus the result is a lighter pixel.
- If the blend color is darker than 50% gray the image is darkened and the result value is a darker one as if it had been multiplied.
- Black pixels in the blend image result in pure black pixels.
- White pixels in the blend image also result in pure white pixels.
![]()
Soft Light

Behaves like the Hard Light mode but in this case the result is comparable to shining a diffused spotlight.
Soft Light darkens or lightens the colors depending on the blend color brightness values :
- If the blend color is lighter than 50% gray the image is dodged, thus the result is a lighter pixel.
- If the blend color is darker than 50% gray the image is darkened and the result value is a darker one as if it had been burned.
- Black pixels in the blend image doesn't result in pure black pixels, but they are significantly darker.
- White pixels in the blend image neither result in pure white pixels, but produce lighter ones.
Overlay

The base image is not replaced but is mixed with the blend image to reflect the lightness or darkness of the original color. This mode is very useful for working with embossed objects as base images. You can then overlay the existing pixels while preserving the highlights and shadows of the base color.
Another example where this composition mode is recommended is the application of textures. Using textures with the normal blend mode and opacity slider is not optimal because the base image colors shine trough. Set the texture as the base image and use the overlay mode. This way only the light effects (which render a 3D impression like in the emboss special effect) are visible preserving the "color" of the blend image. Here Kong seems to be "tatood" on the forest !
Dodge

This blend mode is named after traditionnal technique in photography where you diffuse the amount of light that reaches the film and thus result in a much lighter print.
Burn

The burn blending mode is the opposite of dodge mode. It's like using a magnifying glass to concentrate the amount of light that is received by the film.
Exclusion

The effect created using this blend mode is similar but softer than the difference mode.
- Blending with white inverts the base color values.
- Blending with black produces no change.
- Brightness values in between are applyied a much softer effect than the difference mode.
![]()